
Concurrent Programming in Fsharp Using Hopac - Part 7
Hello there!
Almost eight years back Tomas Petricek wrote a blog post introducing BlockingQueueAgent<T> and followed it up with another blog post on how to apply it to solve an Image Processing problem using the pipeline concurrency pattern.
In this blog post, we are going to learn how to port this example using Hopac's BoundedMb abstraction, aka Bounded Mailbox.
Image processing pipeline
As defined by Tomas in his blog post, the image processing pipeline works as depicted in the below image.
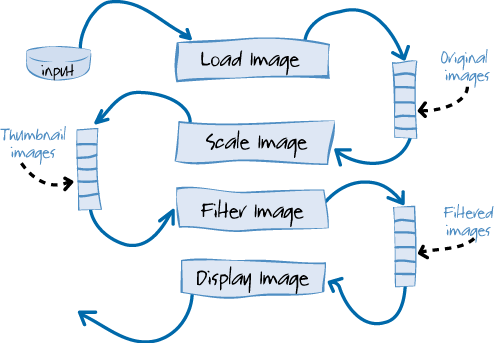
Diagram is from the Parallel Programming with Microsoft .NET book.
The first phase reads images from the disk and stores them into a temporary buffer. The second phase takes images from the buffer, resizes them and puts them into another buffer. The third phase is similar but it adds noise to the image.
Finally, the fourth phase takes images from the last buffer and displays them in the user interface.
The intermediate buffers have only limited capacity. When a buffer is full, it will block the caller until an item is removed. Similarly, when it is empty, it will block the process that reads images until an item is added.
A pipeline introduces parallelism, because all phases can run in parallel. The intermediate buffers provide a good way of controlling the process, because some phases may be faster - in that case, we want to block it after it generates enough inputs for the next phase.
- Tomas Petricek
Channel V/S Bounded Mailbox
We saw how to [leverage Hopac Channels](/blog/concurrent-programming-in-fsharp-using-hopac-part-2.mmark" >}}) Ch<T> in the previous blog posts to communicate between two concurrent Jobs.
In communication via Channels, the producer give the message to the Channel (Ch<T>) and waits until a consumer take it from the Channel (Ch<T>)

In this case, if the consumer is slow in taking up the message from the channel, the producer is blocked.
In Hopac, Bounded Mailbox is similar to Channels except that it introduces a buffer between the producer and the consumer. It also provides back-pressure in the form of blocking producers when consumers cannot keep up.

With this understanding, let's jump in and put it in action!
NOTE: There is also a variant called
sendin Channel (available viaCh.send) which puts the message into the channel and doesn't wait for the consumer totake.
The Image Job
Let's define two types to represent an image and an image Job
type Image = Image of string
type ImageJob = Image -> Job<Image>
To keep it simple, we are going to simulate the image processing logic, by treating each image as a plain string. Also, each image job (scaling, filtering, etc.,) just going to append what it does to this plain string.
// int -> string -> Image -> Job<Image>
let imageJob delay jobName (Image image) = job {
  printfn "%s Started: %s" jobName image // <1>
  do! timeOutMillis delay // <2>
  let newImage = sprintf "%s [%s]" image jobName // <3>
  printfn "%s Completed: %s" jobName newImage // <4>
  return (Image newImage)
}

// ImageJobs ( Image -> Job<Image> )

let scaleImage = imageJob 2000 "Scaling"
let filterImage = imageJob 1500 "Filtering"
let displayImage = imageJob 500 "Displaying"
<1> & <4> - Prints the status of the job in the console. <br/> <2> - Fakes the image processing logic using a delay. <br/> <3> - Appends the performed job name into the string and returns the new image.
Then using the imageJob function, we define the three fake image jobs with different delays.
When we run these jobs, we'll get an output similar to the below one for a single image Foo.png.
Scaling Started: Foo.png
Scaling Completed: Foo.png [Scaling]
Filtering Started: Foo.png [Scaling]
Filtering Completed: Foo.png [Scaling] [Filtering]
Displaying Started: Foo.png [Scaling] [Filtering]
Displaying Completed: Foo.png [Scaling] [Filtering] [Displaying]
BoundedMb In Action
Let's create a new type BoundedWorker to define the worker job that is going to run the Image Jobs that we described in the previous step.
type BoundedWorker (queueLength, f : ImageJob) =
  let inMb = new BoundedMb<Image>(queueLength)
  member __.InMb = inMb
This BoundedWorker receives its queue length and the ImageJob it has to perform as its inputs and intitialize its internal mailbox inMb with the provided queue length. It also exposes this inMb to the outside world via the getter property InMb.
Then define a new method CreateJob which will create a job that retrieves a image from its input mailbox inMb, runs the image job and put the result back to the output mailbox outMb.
type BoundedWorker (queueLength, f : ImageJob) =
  // ...
  // BoundedMb<Image> -> Job<unit>
  member __.CreateJob (outMb : BoundedMb<Image>) =
    BoundedMb.take inMb
    |> Alt.afterJob f
    |> Alt.afterJob (BoundedMb.put outMb)
You can recognise a difference between the programming models of Hopac and Actor here. In the BlockingQueueAgent (an implementation based on Actor model) case, the Consumer has to have a reference of the Producer.
// Code Copied from http://tomasp.net/blog/parallel-extra-image-pipeline.aspx/

let loadedImages = new BlockingQueueAgent<_>(queueLength)
let scaledImages = new BlockingQueueAgent<_>(queueLength)
let filteredImages = new BlockingQueueAgent<_>(queueLength)

let scalePipelinedImages = async {
  while true do
    let! info = loadedImages.AsyncGet()
  // ...

let displayPipelinedImages = async {
  while true do
  let! info = filteredImages.AsyncGet()
  // ...
In our example using Hopac, the consumer and the producer are completely decoupled through BoundedMb.
The current implementation of CreateJob method will work only for the first image as we are taking the image only at the beginning using BoundedMb.take. To run the Job for all the images in the inMb, we need to make the following change.
type BoundedWorker (queueLength, f : ImageJob) =
  // ...

- // BoundedMb<Image> -> Job<unit>
+ // int * BoundedMb<Image> -> Job<unit>
- member __.CreateJob (outMb : BoundedMb<Image>) =
+ member __.CreateJob (imageCount: int, outMb : BoundedMb<Image>) =
    BoundedMb.take inMb
    |> Alt.afterJob f
    |> Alt.afterJob (BoundedMb.put outMb)
+   |> Job.forN imageCount
Job.forN- Creates a job that runs the given job sequentially the given number of times.
We also need to account for a particular case wherein the Display Image stage doesn't put the processed output into outMb.
Let's create another method to address this.
type BoundedWorker (queueLength, f : ImageJob) =
  // ...
  // int -> Job<unit>
  member __.CreateJob (imageCount: int) =
    BoundedMb.take inMb
    |> Alt.afterJob f
    |> Alt.afterJob (fun _ -> ())
    |> Job.forN imageCount
Loading Image
Let's turn our attention to load the images and put them into a BoundedMb.
// BoundedMb<'a> -> 'a list -> Alt<unit>
let rec loadImages inMb inputs =
  match inputs with
  | [] -> Alt.always ()
  | x :: xs ->
    BoundedMb.put inMb x
    |> Alt.afterJob (fun _ -> loadImages inMb xs)
The loadImages function recursively iterates the given list and put each element into the given bounded mailbox inMb.
The Pipeline

Now we have all the essential things; it is time to line them up and get the job done!
// Image list -> Job<unit>
let pipeline images =
  let imagesCount = List.length images
  let queueLength = 3

  let imageScaler = BoundedWorker(queueLength, scaleImage)
  let imageFilterer = BoundedWorker(queueLength, filterImage)
  let imageDisplayer = BoundedWorker(queueLength, displayImage)

  loadImages imageScaler.InMb images |> start // <1>

  [ imageScaler.CreateJob(imagesCount, imageFilterer.InMb)
    imageFilterer.CreateJob(imagesCount,  imageDisplayer.InMb)
    imageDisplayer.CreateJob(imagesCount)] // <2>
  |> Job.conIgnore // <3>
<1> Loads the provided images into the imageScaler's InMb.
<2> Creates three Jobs by providing the imageFilterer's InMb to imageScaler, imageDisplayer's InMb to imageFilterer
<3> Runs all the three jobs parallelly and waits for all them to complete using Job.conIgnore.
If we run this pipeline with below input,
let images = [Image "Foo.png"; Image "Bar.png";Image "Baz.png"]

#time "on"
pipeline images |> run
#time "off"
We'll get the following output.
Scaling Started: Foo.png
Scaling Completed: Foo.png [Scaling]
Scaling Started: Bar.png
Filtering Started: Foo.png [Scaling]
Filtering Completed: Foo.png [Scaling] [Filtering]
Displaying Started: Foo.png [Scaling] [Filtering]
Scaling Completed: Bar.png [Scaling]
Scaling Started: Baz.png
Filtering Started: Bar.png [Scaling]
Displaying Completed: Foo.png [Scaling] [Filtering] [Displaying]
Filtering Completed: Bar.png [Scaling] [Filtering]
Displaying Started: Bar.png [Scaling] [Filtering]
Displaying Completed: Bar.png [Scaling] [Filtering] [Displaying]
Scaling Completed: Baz.png [Scaling]
Filtering Started: Baz.png [Scaling]
Filtering Completed: Baz.png [Scaling] [Filtering]
Displaying Started: Baz.png [Scaling] [Filtering]
Displaying Completed: Baz.png [Scaling] [Filtering] [Displaying]
Real: 00:00:08.065, CPU: 00:00:00.085, GC gen0: 0, gen1: 0
Summary
In this blog post, we saw how to use BoundedMb in Hopac to develop concurrent programs. Also, we have seen the difference between the Actor Programming Model and Concurrent ML, a programming model used by Hopac. The source code associated with this blog post is available on GitHub.
