
In the last blog post, we have seen how we can combine small functions to create a REST API in Suave and in this blog post we are going to see how can we secure the APIs using JSON web tokens(JWT).
This blog post is based on Taiseer’s blog post on JSON Web Token in ASP.NET Web API 2 using Owin and I will be covering how to implement the same in Suave. If you are interested in the theoretical background of JWT, kindly read his blog post before reading this.
Workflow
The typical workflow of JWT based application would look like this
- New Audience (Resource Server) gets registered with Authorization Server.
- Get the JWT access token from Authorization Server by passing Client Id of the resource server and login credentials
- Use the access token obtained above to get access to the secured resources in the resource server
We are going to see how to implement all these three steps in this blog post
Project Setup
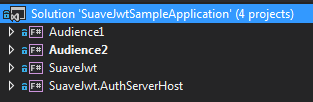
Create an empty visual studio solution and add new projects with the following name
- SuaveJwt - A fsharp library project which contains all the JWT related things
- SuaveJwt.AuthServerHost - A fsharp console application which is going to host the authorization server
- Audience1 - A fsharp console application representing the resource server 1
- Audience2 - A fsharp console application representing the resource server 2
After creating, install the following NuGet packages
- Suave in all the four projects
- Newtonsoft.Json and JSON Web Token Handler in SuaveJwt
Then add reference the .NET framework library System.IdentityModel in all the four projects from GAC and then add a reference to the SuaveJwt project library in all the other three projects.
New Audience Registration
As we have seen in the workflow, the first step is to enable an audience to register itself with the authorization server. Let’s begin by defining the business logic.
Add a new source file JwtToken.fs in the SuaveJwt project and update it as follows
type Audience = {
  ClientId : string
  Secret : Base64String
  Name : string
}

// string -> Audience
let createAudience audienceName =
  let clientId = Guid.NewGuid().ToString("N")
  let data = Array.zeroCreate 32
  RNGCryptoServiceProvider.Create().GetBytes(data)
  let secret = data |> Base64String.create
  {ClientId = clientId; Secret = secret; Name =  audienceName}
The above snippet creates an audience record with a random client id and secret key. The secret key is of type base64 URL encoded string. This type doesn’t exist, so let’s create it.
Add a new source file Encodings.fs in the SuaveJwt project and add this type
type Base64String = private Base64String of string with

  static member decode (base64String : Base64String) =
    let (Base64String text) = base64String
    let pad text =
      let padding = 3 - ((String.length text + 3) % 4)
      if padding = 0 then text else (text + new String('=', padding))

    Convert.FromBase64String(pad(text.Replace('-', '+').Replace('_', '/')))

  static member create data =
    Convert.ToBase64String(data)
      .TrimEnd('=')
      .Replace('+', '-')
      .Replace('/', '_') |> Base64String;


  static member fromString = Base64String

  override this.ToString() =
    let (Base64String str) = this
    str
To keep things simple, I haven’t added any validations here. The next step is to create a Suave WebPart to expose the audience create functionality.
Add a new source file AuthServer.fs in the SuaveJwt project and update it as below
type AudienceCreateRequest = {
  Name : string
}

type AudienceCreateResponse = {
  ClientId : string
  Base64Secret : string
  Name : string
}

type Config = {
  AddAudienceUrlPath : string
  SaveAudience : Audience -> Async<Audience>
}

let audienceWebPart config =

  let toAudienceCreateResponse (audience : Audience) = {
    Base64Secret = audience.Secret.ToString()
    ClientId = audience.ClientId
    Name = audience.Name
  }

  let tryCreateAudience (ctx: HttpContext) =
    match mapJsonPayload<AudienceCreateRequest> ctx.request with
    | Some audienceCreateRequest ->
        async {
          let! audience =
            audienceCreateRequest.Name |> createAudience |> config.SaveAudience
          let audienceCreateResponse = toAudienceCreateResponse audience
          return! JSON audienceCreateResponse ctx
        }
    | None -> BAD_REQUEST "Invalid Audience Create Request" ctx

  path config.AddAudienceUrlPath >=> POST >=> tryCreateAudience
The audienceWebPart function retrieves the AudienceCreateRequest from the JSON request payload and creates a new audience. To make it independent of the host, we have externalized the hosting functionality using the Config record type.
The mapJsonPayload and JSON functions serialize and deserialize JSON objects across the wire respectively. These functions are not part of Suave, so let’s add them
Add a new source file SuaveJson.fs in the SuaveJwt project and add these functions
let JSON v =
  let jsonSerializerSettings = new JsonSerializerSettings()
  jsonSerializerSettings.ContractResolver <- new CamelCasePropertyNamesContractResolver()

  JsonConvert.SerializeObject(v, jsonSerializerSettings)
  |> OK
  >=> Writers.setMimeType "application/json; charset=utf-8"

let mapJsonPayload<'a> (req : HttpRequest) =
  let fromJson json =
    try
      let obj = JsonConvert.DeserializeObject(json, typeof<'a>) :?> 'a
      Some obj
    with
    | _ -> None

  let getString rawForm =
    System.Text.Encoding.UTF8.GetString(rawForm)

  req.rawForm |> getString |> fromJson
The next step is hosting this audience web part.
Open the Program.fs file in the SuaveJwt.AuthServerHost project and update it as below
let authorizationServerConfig = {
  AddAudienceUrlPath = "/api/audience"
  SaveAudience = AudienceStorage.saveAudience
}
let audienceWebPart' = audienceWebPart authorizationServerConfig
startWebServer defaultConfig audienceWebPart'
0
It is a straight forward self-host suave server program which exposes the audience web part.
The AudienceStorage is responsible for storing the created audiences and to add it create a new source file AudienceStorage.fs in the SuaveJwt.AuthServerHost project and add these functions
module AudienceStorage

let private audienceStorage
  = new Dictionary<string, Audience>()

let saveAudience (audience : Audience) =
  audienceStorage.Add(audience.ClientId, audience)
  audience |> async.Return
To keep this simple, we are using in-memory dictionary here and it can be easily replaced with any data store
Now we have everything to create a new audience. So, let’s run the SuaveJwt.AuthServerHost application and verify
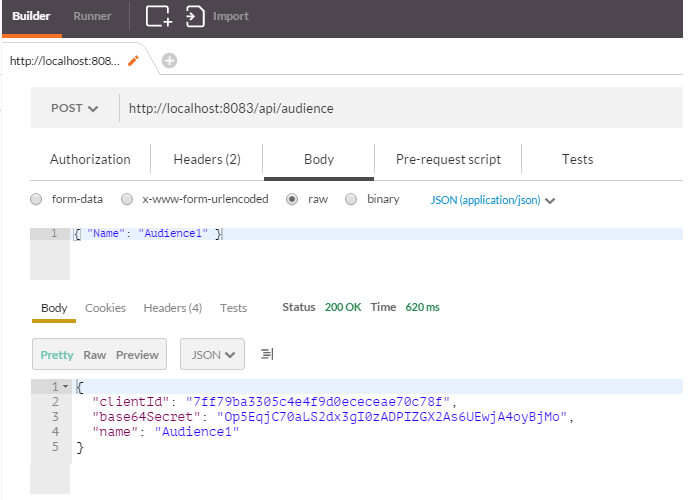
Keep a note of this clientId and base64Secret as we will be using them while defining the resource server (“Audience1” in this case).
Generating Access Token
After registering an audience with the authorization server, the next step is to get the access token to access the resources in the given resource server.
Let’s begin by defining the business logic to create an access token.
Open JwtToken.fs and add the following types
type TokenCreateRequest = {
  Issuer : string
  UserName : string
  Password : string
  TokenTimeSpan : TimeSpan
}

type IdentityStore = {
  getClaims : string -> Async<Claim seq>
  isValidCredentials : string -> string -> Async<bool>
  getSecurityKey : Base64String -> SecurityKey
  getSigningCredentials : SecurityKey -> SigningCredentials
}

type Token = {
  AccessToken : string
  ExpiresIn : float
}
These types are generic abstractions which decouple the token creation part from the underlying host.
The TokenCreateRequest models the underlying issuer and token lifetime.
The IdentityStore represents a generic data store in which the identity information has been stored and it also provides the security key and the signing credentials to protect the access token from misuse.
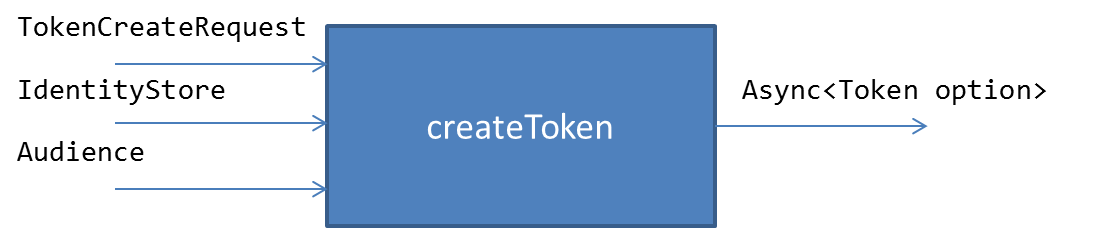
With these types in place let’s add the createToken function in the SuaveJwt.fs file
let createToken tokenCreateRequest identityStore audience =
  async {
    let! isValidCredentials =
      identityStore.isValidCredentials tokenCreateRequest.UserName tokenCreateRequest.Password
    if isValidCredentials then
      let signingCredentials =
        (identityStore.getSecurityKey >> identityStore.getSigningCredentials) audience.Secret
      let issuedOn = Nullable DateTime.UtcNow
      let expiresBy =
        Nullable (DateTime.UtcNow.Add(tokenCreateRequest.TokenTimeSpan))
      let! claims =  identityStore.getClaims tokenCreateRequest.UserName
      let jwtSecurityToken =
        new JwtSecurityToken(tokenCreateRequest.Issuer, audience.ClientId, claims, issuedOn, expiresBy, signingCredentials)
      let handler = new JwtSecurityTokenHandler()
      let accessToken = handler.WriteToken(jwtSecurityToken)
      return Some {AccessToken = accessToken; ExpiresIn = tokenCreateRequest.TokenTimeSpan.TotalSeconds}
    else return None
  }
The createToken function checks the validness of the login credentials. If it is valid, then it get the claims associated with the given username and creates a JwtToken using the JSON Web Token Handler library, else it returns None.
Now we have got the backend business logic ready, let’s expose it as a suave WebPart
Open AuthServer.fs and add a new record type for the incoming token create request and update Config and audienceWebPart as below
type TokenCreateCredentials = {
  UserName : string
  Password : string
  ClientId : string
}

type Config = {
  // ... existing fields ...
  CreateTokenUrlPath : string
  GetAudience : string -> Async<Audience option>
  Issuer : string
  TokenTimeSpan : TimeSpan
}

let audienceWebPart config identityStore =

  // ... existing functions ...

  let tryCreateToken (ctx: HttpContext) =
    match mapJsonPayload<TokenCreateCredentials> ctx.request with
    | Some tokenCreateCredentials ->
      async {
        let! audience = config.GetAudience tokenCreateCredentials.ClientId
        match audience with
        | Some audience ->
            let tokenCreateRequest : TokenCreateRequest = {
              Issuer = config.Issuer
              UserName = tokenCreateCredentials.UserName
              Password = tokenCreateCredentials.Password
              TokenTimeSpan = config.TokenTimeSpan
            }
            let! token = createToken tokenCreateRequest identityStore audience
            match token with
            | Some token -> return! JSON token ctx
            | None -> return! BAD_REQUEST "Invalid Login Credentials" ctx

        | None -> return! BAD_REQUEST "Invalid Client Id" ctx
      }
    | None -> BAD_REQUEST "Invalid Token Create Request" ctx

  choose [
    path config.AddAudienceUrlPath >=> POST >=> tryCreateAudience
    path config.CreateTokenUrlPath >=> POST >=> tryCreateToken
  ]
The tryCreateToken function checks whether the ClientId is a registered audience or not, if it exists, then this function creates a token using the createToken function defined above otherwise it returns the BAD_REQUST WebPart with the appropriate error message.
The final change is modifying the Program.fs and AudienceStorage.fs files in the SuaveJwt.AuthServerHost to expose this WebPart.
// Program.fs
let authorizationServerConfig = {
  AddAudienceUrlPath = "/api/audience"
  CreateTokenUrlPath = "/oauth2/token"
  SaveAudience = AudienceStorage.saveAudience
  GetAudience = AudienceStorage.getAudience
  Issuer = "http://localhost:8083/suave"
  TokenTimeSpan = TimeSpan.FromMinutes(1.)
}

let identityStore = {
  getClaims = IdentityStore.getClaims
  isValidCredentials = IdentityStore.isValidCredentials
  getSecurityKey = KeyStore.securityKey
  getSigningCredentials = KeyStore.hmacSha256
}

let audienceWebPart' = audienceWebPart authorizationServerConfig identityStore

startWebServer defaultConfig audienceWebPart'
// AudienceStorage.flet getAudience clientId =
if audienceStorage.ContainsKey(clientId) then
Some audienceStorage.[clientId] |> async.Return
else
None |> async.ReturnsThe KeyStore and IdentityStore do not exists, so let’s add them
Add KeyStore.fs in the SuaveJwt project and it provide the in-memory symmetric security key based on HMAC.
module KeyStore
open System.IdentityModel.Tokens
open Encodings

let securityKey sharedKey : SecurityKey =
  let symmetricKey = sharedKey |> Base64String.decode
  new InMemorySymmetricSecurityKey(symmetricKey) :> SecurityKey

let hmacSha256 secretKey =
  new SigningCredentials(secretKey,SecurityAlgorithms.HmacSha256Signature, SecurityAlgorithms.Sha256Digest)
Then add IdentityStore.fs in the SuaveJwt.AuthServerHost project.
module IdentityStore
open System.Security.Claims

let getClaims userName =
  seq {
    yield (ClaimTypes.Name, userName)
    if (userName = "Admin") then
      yield (ClaimTypes.Role, "Admin")
    if (userName = "Foo") then
      yield (ClaimTypes.Role, "SuperUser")
  } |> Seq.map (fun x -> new Claim(fst x, snd x)) |> async.Return

let isValidCredentials username password =
  username = password |> async.Return
To keep this simple, I am just hardcoding the credentials and claims here and it can be replaced with any backend. In this case, I am just going with accepting all the credentials as valid if the username and password are same.
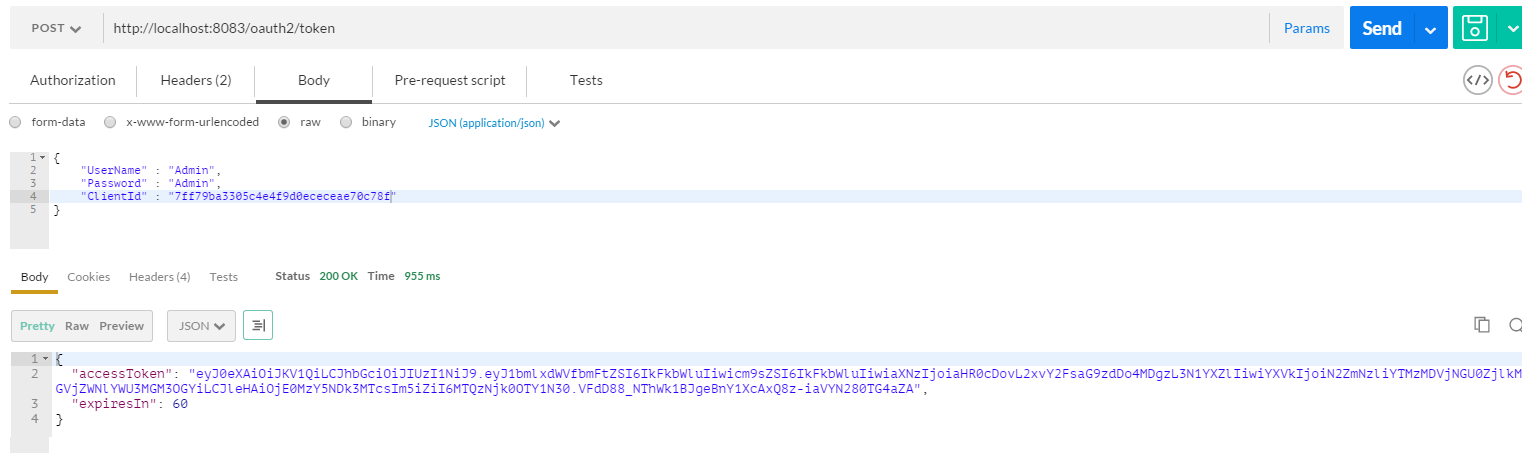
Let’s run the SuaveJwt.AuthServerHost and verify the token
Securing the resources
Now we have come to the interesting part of securing the resources using the access token created in the above step.
The first step to achieving this to validate the incoming access token. Let’s add this validation logic in the JwtToken.fs file.
type TokenValidationRequest = {
  Issuer : string
  SecurityKey : SecurityKey
  ClientId : string
  AccessToken : string
}

let validate tokenValidationRequest =
  let tokenValidationParameters =
    let validationParams = new TokenValidationParameters()
    validationParams.ValidAudience <- tokenValidationRequest.ClientId
    validationParams.ValidIssuer <- tokenValidationRequest.Issuer
    validationParams.ValidateLifetime <- true
    validationParams.ValidateIssuerSigningKey <- true
    validationParams.IssuerSigningKey <-  tokenValidationRequest.SecurityKey
    validationParams
  try
    let handler = new JwtSecurityTokenHandler()
    let principal =
      handler.ValidateToken(tokenValidationRequest.AccessToken, tokenValidationParameters, ref null)
    principal.Claims |> Choice1Of2
  with
    | ex -> ex.Message |> Choice2Of2
The validate function returns a Choice type which contains either a sequence of Claims present in the token if the access token is valid or an error message describing what’s wrong with the access token
The next step is using this function to secure a Suave WebPart.
Create a new source file Secure.fs in the SuaveJwt project and add the following code
type JwtConfig = {
    Issuer : string
    SecurityKey : SecurityKey
    ClientId : string
}

let jwtAuthenticate jwtConfig webpart (ctx: HttpContext) =

  let updateContextWithClaims claims =
    { ctx with userState = ctx.userState.Remove("Claims").Add("Claims", claims) }

  match ctx.request.header "token" with
  | Choice1Of2 accessToken ->
      let tokenValidationRequest =  {
        Issuer = jwtConfig.Issuer
        SecurityKey = jwtConfig.SecurityKey
        ClientId = jwtConfig.ClientId
        AccessToken = accessToken
      }
      let validationResult = validate tokenValidationRequest
      match validationResult with
      | Choice1Of2 claims -> webpart (updateContextWithClaims claims)
      | Choice2Of2 err -> FORBIDDEN err ctx

  | _ -> BAD_REQUEST "Invalid Request. Provide both clientid and token" ctx
The jwtAuthenticate function validates the access token present in the request header and invokes the given WebPart if it is valid. In case of invalid or absence of access token, it returns an HTTP error response instead of executing the WebPart.
Upon successful access token validation, the jwtAuthenticate function puts the claims in the userState map of incoming HttpContext so that subsequent WebParts in the pipeline can use it.
The JwtConfig record abstracts the underlying audience from the validation logic so that it can be reused across multiple audiences.
Now we have a functionality secure a web part. Let’s create an audience and leverage this
Update the Program.fs file in the Audience1 project as mentioned below
[<EntryPoint>]
let main argv =

  let jwtConfig = {
    Issuer = "http://localhost:8083/suave"
    ClientId = "7ff79ba3305c4e4f9d0ececeae70c78f"
    SecurityKey = KeyStore.securityKey (Base64String.fromString "Op5EqjC70aLS2dx3gI0zADPIZGX2As6UEwjA4oyBjMo")
  }

  let sample1 = path "/audience1/sample1" >=> jwtAuthenticate jwtConfig (OK "Sample 1")
  let config = { defaultConfig with bindings = [HttpBinding.mkSimple HTTP "127.0.0.1" 8084] }

  startWebServer config sample1
  0
I’ve asked you to keep a note of the clientId and the securityKey while doing the registration of Audience1. We are using them here in the jwtConfig record.
Let’s see it in action
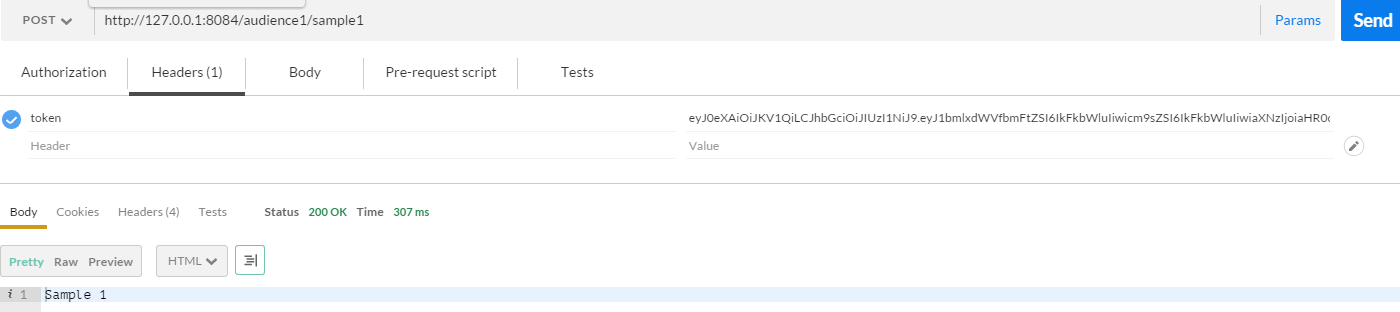
Hurray! We have made it. “/audience1/sample1” is a secured API now!
What will happen if we mess with the access token? Well, we will get an HTTP error. Let’s change the character Q in the access token from upper case to lower case and here is the result of it.
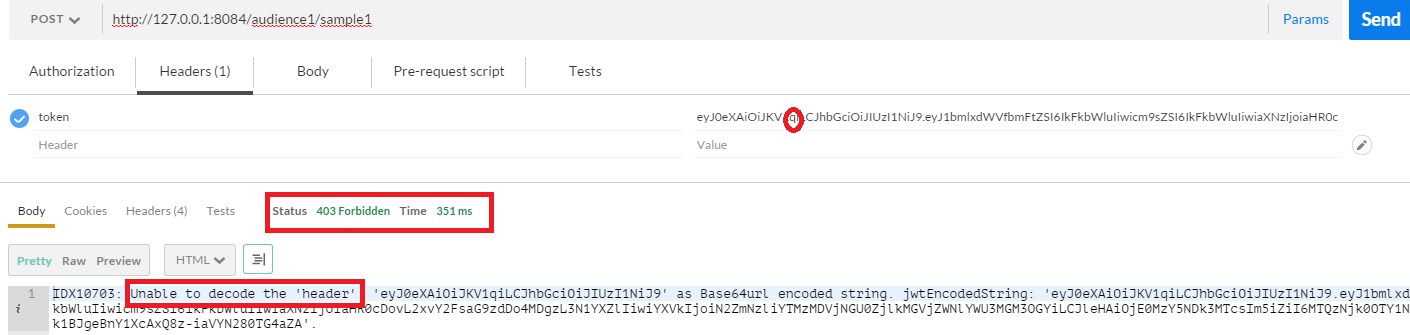
Cool, Isn’t it?
Let’s add authorization based on the claims that we have obtained from the JWT token
Open Secure.fs and update the authorization functionality.
type AuthorizationResult =
  | Authorized
  | UnAuthorized of string

let jwtAuthorize jwtConfig authorizeUser webpart  =

  let getClaims (ctx: HttpContext) =
    let userState = ctx.userState
    if userState.ContainsKey("Claims") then
      match userState.Item "Claims" with
      | :? (Claim seq) as claims -> Some claims
      | _ -> None
    else
        None

  let authorize httpContext =
    match getClaims httpContext with
    | Some claims ->
        async {
          let! authorizationResult = authorizeUser claims
          match authorizationResult with
          | Authorized -> return! webpart httpContext
          | UnAuthorized err -> return! FORBIDDEN err httpContext
        }
    | None -> FORBIDDEN "Claims not found" httpContext

  jwtAuthenticate jwtConfig authorize
The jwtConfig function is very similar to the jwtAuthenticate function which provides authorization in addition to the authentication.
The key here is the parameter authorizeUser which is a function that takes a sequence of claims and returns an AuthorizationResult.
Like jwtAuthenticate function, the jwtConfig function is also abstracted from the underlying Audience so we can use it across multiple Audiences.
Let’s use this in the Audience1.
[<EntryPoint>]
let main argv =

  // ... existing code ...

  // Claim Seq -> Async<AuthorizationResult>
  let authorizeAdmin (claims : Claim seq) =
    match claims |> Seq.tryFind (fun c -> c.Type = ClaimTypes.Role && c.Value = "Admin") with
    | Some _ -> Authorized |> async.Return
    | None -> UnAuthorized "User is not an admin" |> async.Return

  let sample2 = path "/audience1/sample2" >=> jwtAuthorize jwtConfig authorizeAdmin (OK "Sample 2")
  let app = choose [sample1;sample2]

  startWebServer config app
  0
The jwtAuthroize function in action

Note: I’ve generated a new access token here to exercise this use case.
That’s it we have successfully completed all the three steps mentioned at the beginning of this blog post.
A Supplement
One cool thing about the design of the SuaveJwt library is, it doesn’t have any assumption about the Authorization Server and the Resource Server. Because of it, we can easily extend it.
Let’s prove it by updating the Program.fs file in the Audience2 project.
[<EntryPoint>]
let main argv =
  let jwtConfig = {
    Issuer = "http://localhost:8083/suave"
    ClientId = "ada9263885c440869fb484fe354de13d"
    SecurityKey = KeyStore.securityKey (Base64String.fromString "0RWyzyttDmJtiaYkG9rph5cqxCTI8YAOsR7stq-P_5o")
  }

  let authorizeSuperUser (claims : Claim seq) =
    match claims |> Seq.tryFind (fun c -> c.Type = ClaimTypes.Role && c.Value = "SuperUser") with
    | Some _ -> Authorized |> async.Return
    | None -> UnAuthorized "User is not a Super User" |> async.Return

  let authorize = jwtAuthorize jwtConfig
  let sample1 = path "/audience2/sample1" >=> OK "Sample 1"
  let sample2 = path "/audience2/sample2" >=> authorize authorizeSuperUser (OK "Sample 2")
  let config = { defaultConfig with bindings = [HttpBinding.mkSimple HTTP "127.0.0.1" 8085] }
  let app = choose [sample1;sample2]

  startWebServer config app
  0
Note that the jwtConfig values are different from that of Audience1 and it is obtained from calling the AuthorizationServer’s audience registration API for Audience2.
Summary
Suave provides a simple and elegant way of extending its core functionality. In this blog post, we have seen how to bend it to support JWT based authorization and I believe we can do a lot of other cool things too!
You can find the complete source code of the sample application used in this blog post in my blog-samples GitHub repository.
