
Processing Messages From IBM-MQ in Clojure
The Order Management System(OMS) of our client exposes its operations in the form of messages via IBM-MQ. In this blog post, we are going to focus on setting up the infrastructure to receive and process these messages in our application.
This blog post is a part 6 of the blog series Building an E-Commerce Marketplace Middleware in Clojure.
Setting up IBM-MQ for Local Development
We are going to leverage the IBM-MQ's developers edition docker image for the local development.
The steps for running it are as follows. These steps assumes that you have docker installed in your machine.
# Pulling the latest Docker image
> docker pull ibmcom/mq:latest

# Start the Docker container with the specified configuration parameter
> docker run --env LICENSE=accept --env MQ_QMGR_NAME=QM1 \
             --volume qm1data:/mnt/mqm --publish 1414:1414 \
             --publish 9443:9443 --network mq-demo-network \
             --network-alias qmgr --detach \
             --env MQ_APP_PASSWORD=test123 \
             --name ibmmq \
             ibmcom/mq:latest
We are explicitly setting the name
ibmmqfor this container so that we don't need to repeat this configuration every time when we start the container likedocker start ibmmq.
This ibmmq container exposes two ports 9443, a web console for the administration and 1414, to consume messages from IBM-MQ.
Initializing IBM-MQ Connection
IBM-MQ follows the JMS standard. So, working with this is straight-forward as depicted in this tutorial.
Let's add the configuration parameters in the config.edn and read them using aero as we did for the other configurations.
; resources/config.edn
{:app
 {:database {...}
  :log {...}
  :mq {:host     #or [#env "WHEEL_APP_MQ_HOST" "localhost"]
       :port     #or [#env "WHEEL_APP_MQ_PORT" 1414]
       :channel  #or [#env "WHEEL_APP_MQ_CHANNEL" "DEV.APP.SVRCONN"]
       :qmgr     #or [#env "WHEEL_APP_MQ_QMGR" "QM1"]
       :user-id  #or [#env "WHEEL_APP_MQ_USER_ID" "app"]
       :password #or [#env "WHEEL_APP_MQ_PASSWORD" "test123"]}}}
; src/wheel/infra/config.clj
; ...
(defn mq []
(get-in root [:app :mq]))Then add the IBM-MQ client dependency in project.clj
(defproject wheel "0.1.0-SNAPSHOT"
  ; ...
  :dependencies [; ...
                 [com.ibm.mq/com.ibm.mq.allclient "9.1.0.0"]]
  ; ...
  )
Finally, define a new mount state jms-conn to hold the IBM-MQ's connection.
> touch src/wheel/infra/ibmmq.clj; src/wheel/infra/ibmmq.clj
(ns wheel.infra.ibmmq
(:import [com.ibm.msg.client.jms JmsFactoryFactory]
[com.ibm.msg.client.wmq WMQConstants])
(:require [wheel.infra.config :as config]
[mount.core :as mount]))
(defn- new-jms-conn [{:keys [host port channel qmgr user-id password]}]
(let [ff (JmsFactoryFactory/getInstance WMQConstants/WMQ_PROVIDER)
cf (.createConnectionFactory ff)]
(doto cf
(.setStringProperty WMQConstants/WMQ_HOST_NAME host)
(.setIntProperty WMQConstants/WMQ_PORT port)
(.setStringProperty WMQConstants/WMQ_CHANNEL channel)
(.setIntProperty WMQConstants/WMQ_CONNECTION_MODE WMQConstants/WMQ_CM_CLIENT)
(.setStringProperty WMQConstants/WMQ_QUEUE_MANAGER qmgr)
(.setStringProperty WMQConstants/WMQ_APPLICATIONNAME "WHEEL")
(.setBooleanProperty WMQConstants/USER_AUTHENTICATION_MQCSP true)
(.setStringProperty WMQConstants/USERID user-id)
(.setStringProperty WMQConstants/PASSWORD password))
(.createConnection cf)))
(mount/defstate jms-conn
:start (let [conn (new-jms-conn (config/mq))]
(.start conn)
conn)
:stop (.close jms-conn))To make this new state jms-conn to start during the application bootstrap, let's add the reference of this namespace in infra/core.clj
; src/wheel/infra/core.clj
(ns wheel.infra.core
  (:require ; ...
            [wheel.infra.ibmmq :as ibmmq]))
; ...
Now when we start and stop the application, we can see that this JMS connection is also getting started and stopped.
wheel.infra.core=> (start-app)
{:started ["#'wheel.infra.config/root"
           "#'wheel.infra.database/datasource"
           "#'wheel.infra.database/toucan"
           "#'wheel.infra.ibmmq/jms-conn"]}
wheel.infra.core=> (stop-app)
{:stopped ["#'wheel.infra.ibmmq/jms-conn"
           "#'wheel.infra.database/datasource"]}
Client's Business Operation Model
For each item that our client sells in a marketplace, they will be adding it manually using the marketplace's seller portal. After that client performs the following four operations using the OMS.
- Ranging - Listing items to make them available for sales.
- Deranging - Unlisting items to prevent them from being shown in the marketplace.
- Inventorying - Updates the inventories of items.
- Pricing - Updates the prices of items.
The OMS is configured to communicate these operations to the middleware via four different queues named after this operation.
Consuming Messages from IBM-MQ Queue
Let's add a new configuration item, settings in the config.edn file to specify the queue names that the middleware has to listen.
To start with, let's add the ranging queue name alone.
; resources/config.edn
{:app {...}
 :settings {:oms {:ranging-queue-name "DEV.QUEUE.1"}}}
Then add a wrapper function in config.clj to read these settings.
; src/wheel/infra/config.clj
; ...
(defn oms-settings []
  (get-in root [:settings :oms]))
Now we have the configuration in place to read the queue name. To read messages from this queue, we need to do two things.
- Creating a new JMS Session
- Adding a MessageListener
To perform this, let's add a new file oms.clj
> touch src/wheel/infra/oms.cljThen define a new mount state jms-ranging-session that creates a JMS Session using the JMS Connection that we defined earlier.
; src/wheel/infra/oms.clj
(ns wheel.infra.oms
  (:require [wheel.infra.ibmmq :as ibmmq]
            [mount.core :as mount])
  (:import [javax.jms MessageListener Message]
           [javax.jms Session]))

(defn- stop [stoppable]
  (.close stoppable))

(mount/defstate jms-ranging-session
  :start (.createSession ibmmq/jms-conn false Session/AUTO_ACKNOWLEDGE)
  :stop (stop jms-ranging-session))
Then create a new function message-listener and start-consumer to create the JMS message listener and start the JMS Consumer, respectively.
; src/wheel/infra/oms.clj
; ...
(defn- message-listener []
  (proxy [MessageListener] []
    (onMessage [^Message msg]
      (let [msg (.getBody msg String)]
        (prn "Received: " msg))))) ; <1>

(defn- start-consumer [queue-name jms-session listener]
  (let [ibmmq-queue-name (str "queue:///" queue-name)
        destination      (.createQueue jms-session ibmmq-queue-name)
        consumer         (.createConsumer jms-session destination)]
    (.setMessageListener consumer listener)
    consumer))
<1> We are justing printing the received message in this part and we'll be revisiting it soon.
Finally, use these function to define the mount state for ranging queue consumer.
; src/wheel/infra/oms.clj
; ...
(ns wheel.infra.oms
  (:require ;...
            [wheel.infra.config :as config])
  (:import ...))
; ...
(mount/defstate ranging-consumer
  :start (let [queue-name (:ranging-queue-name (config/oms-settings))
               listener   (message-listener)]
           (start-consumer queue-name jms-ranging-session listener))
  :stop (stop ranging-consumer))
All set to receive messages from IBM-MQ and let's do a test drive.
user==> (reset)
:reloading (...)
{:started ["#'wheel.infra.config/root"
"#'wheel.infra.database/datasource"
"#'wheel.infra.database/toucan"
"#'wheel.infra.ibmmq/jms-conn"
"#'wheel.infra.oms/jms-ranging-session"
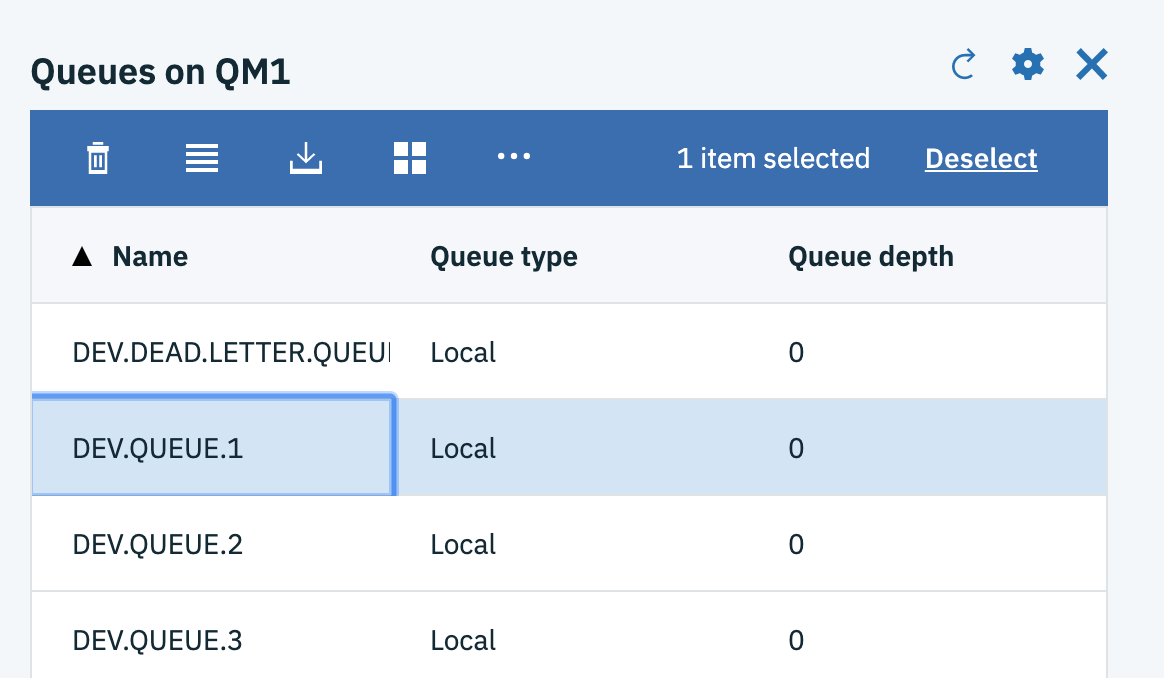
"#'wheel.infra.oms/ranging-consumer"]}To send a message in IBM-MQ, go to its web console, log in using the admin credentials, admin and passw0rd, click the queue name DEV.QUEUE.1
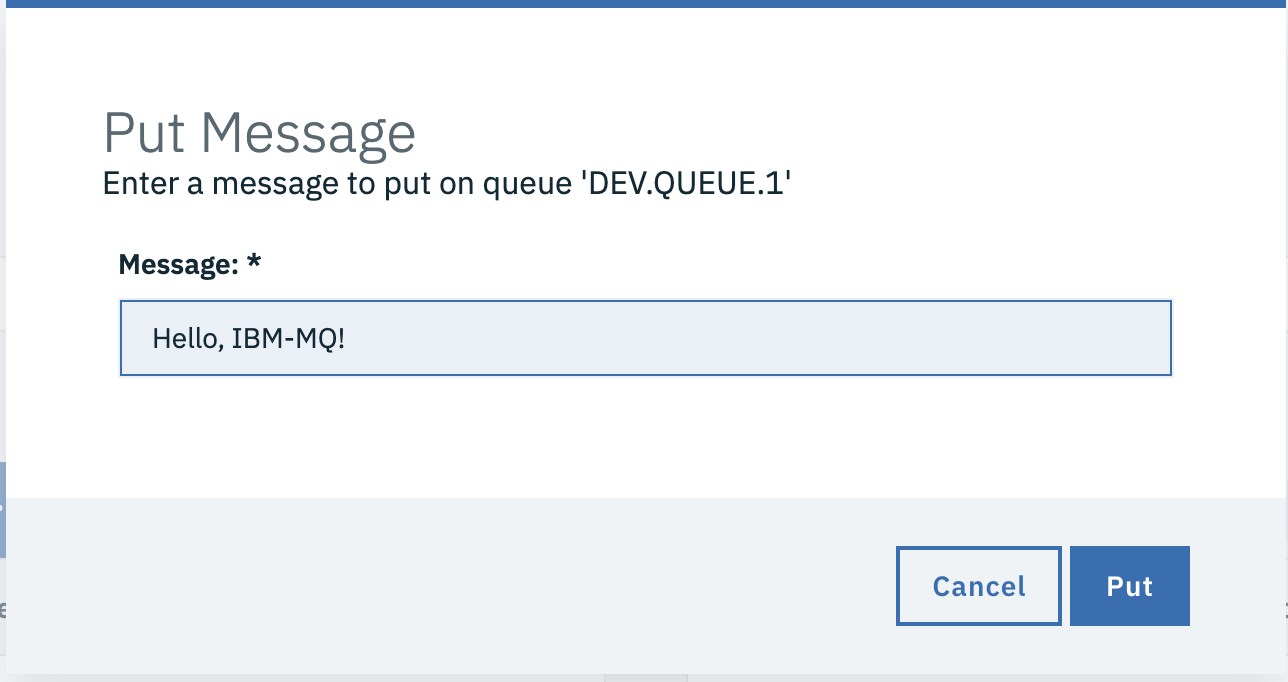
Then click on the downward arrow button in the top of this widget to put a message in this queue. This will open a popup and enter Hello, IBM-MQ! in the text box and click Put.
You should see this message in the terminal that is running the REPL
lein # ...
nREPL server started on port 52740 on host 127.0.0.1 # ...
# ...
"Received: " "Hello, IBM-MQ!"
That's it!
Summary
In this blog post, we learned how to set up and consume messages from IBM-MQ in a Clojure application. Thanks to the first-class JAVA interoperability support in Clojure, we have done it using IBM-MQ's native Java client.
With this, we are done with the setting up the infrastructure aspects of the application. We'll be diving deep into the business side of the application in the upcoming blog posts. Stay tuned!
The source code associated with this part is available on this GitHub repository.
